Geloven Leren
Opinie en tools voor wie begaan is met het katholieke geloof
Raspberry Pi Broadcaster DIY
This article describes how I set up a Raspberry Pi with camera module for fully automated broadcasting live streams to youtube and facebook.
I’m not going to productize it, but let’s give it a name: the RPB (Raspberry Pi Broadcaster).
It is not easy to reconstruct a step-by-step guide, because I went through quite some trial and error. You’ll rather find a collection of related topics.
Features
The RPB’s main control is a webpage, hosted on the Raspberry Pi and accessible on pc or mobile phone, from the internet (remote) or from the local network. It allows to preview video and sound and to start and stop livestreaming to preconfigured destinations. There’s also a function to reboot the RPB, just in case…
The controls are very minimalistic, because the RPB is to be used by low-tech users. The RPB is deployed in a church, where each week holy mass is livestreamed.
For the administrator… there’s nothing. Most of the setup is hardcoded, which is not that bad, because the amount of code is very limited.
Here’s what the interface looks like:
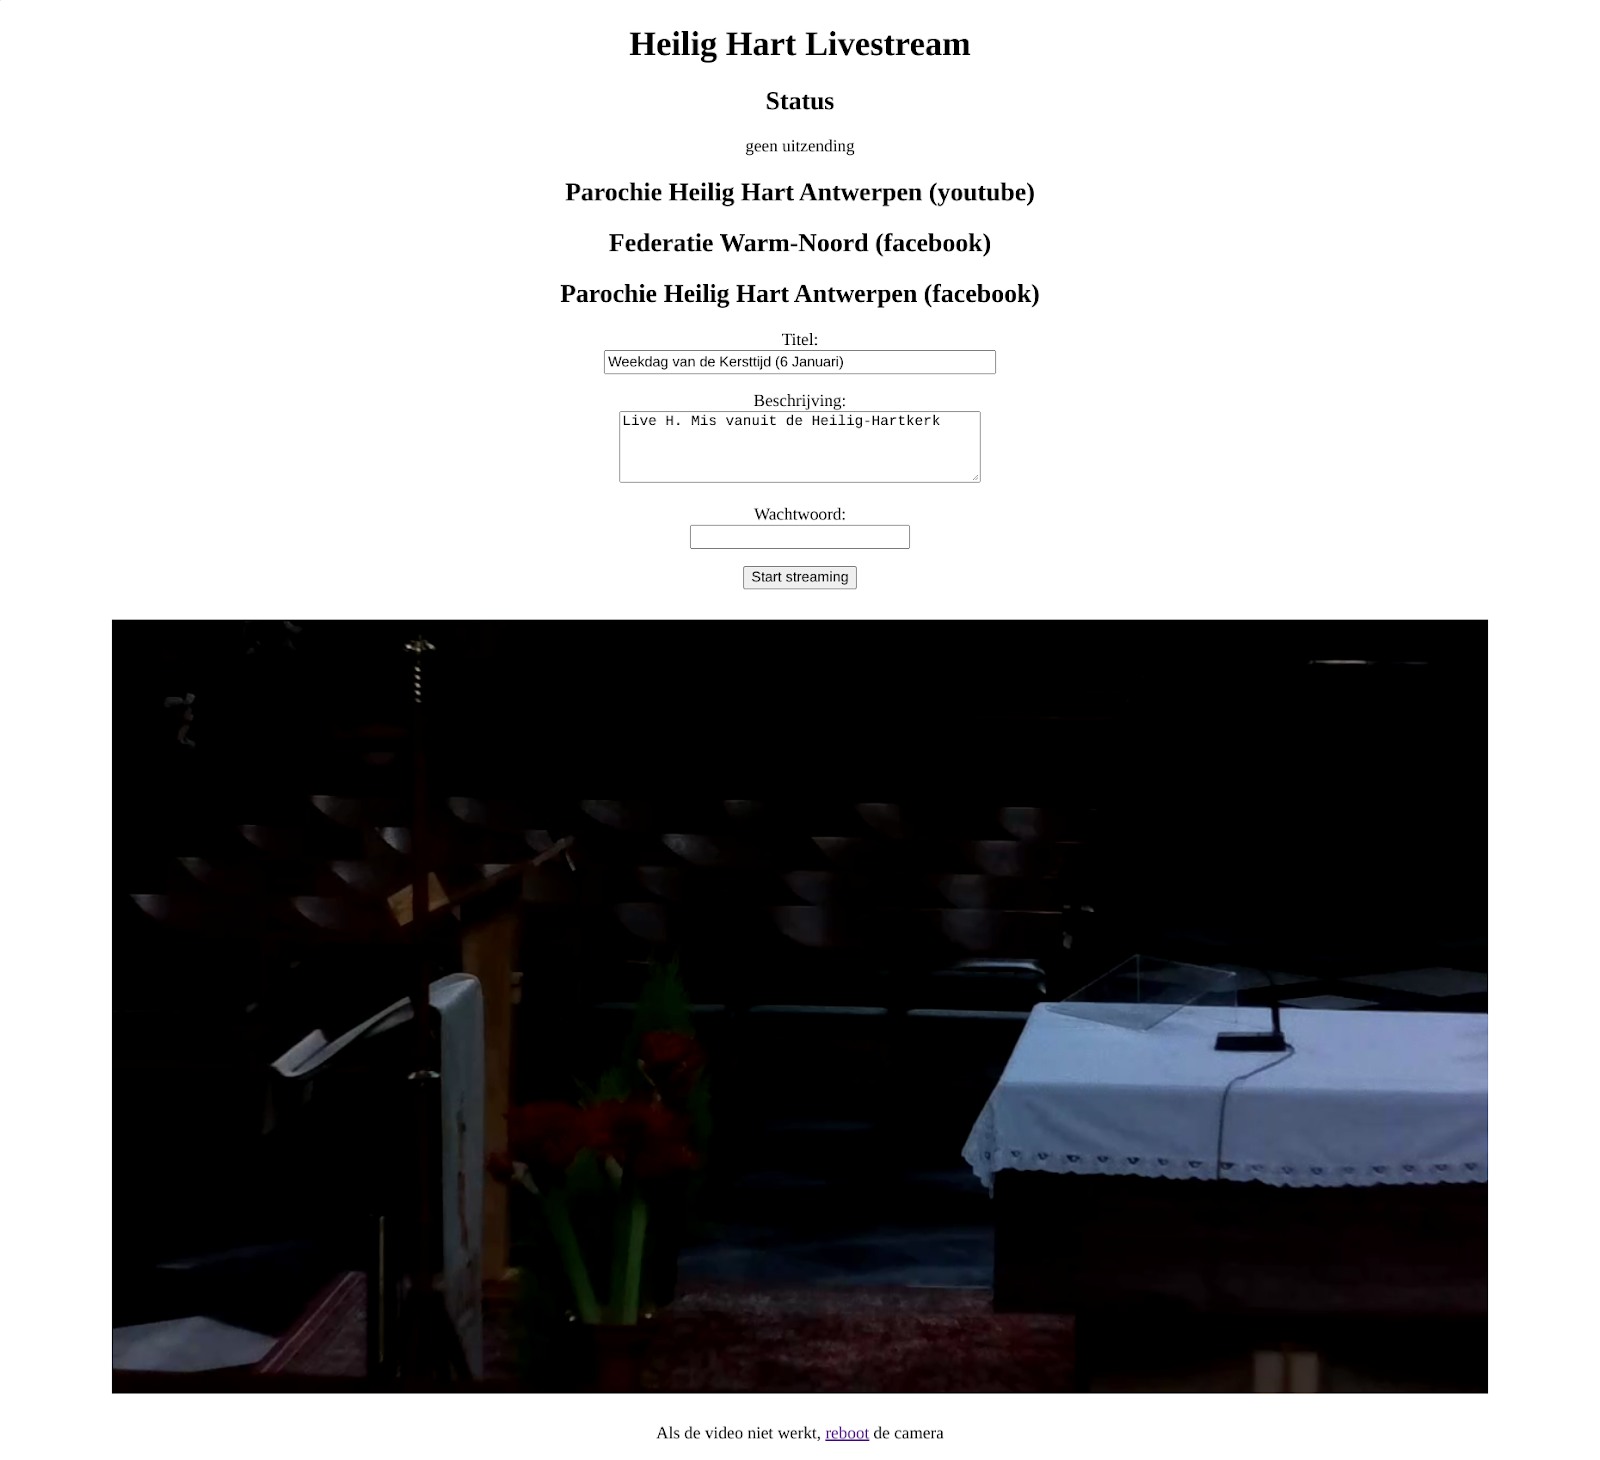
You can
- enter a title and description for the stream,
- preview the video and audio and
- start the stream when ready to go.
Architecture
Let’s have a look at the overall architecture of the RPB.
The bold arrows show how the video flows. The input ffmpeg is always running and launched by the nginx server. The output ffmpeg is only running when a livestream is being broadcasted. It is launched by my cgi script, after a negotiation with the youtube and facebook api’s to obtain the rtmp addresses to stream to.
Software tools
I’m more of a scripter than a programmer. There’s some html, cgi, python, bash and a tiny bit of javascript. And lots of configuration files.
The tools that do most of the work are ffmpeg, nginx and fcgiwrap. The youtube live streaming api and facebook graph api also come into play.
Equipment
My equipment list:
- Raspberry Pi 4
- HQ camera module
- A canon 25mm C-mount lens from ebay
- A UPS module
- A USB audio converter, connected up to our amplifier
- A home-made control box featuring a button, a switch and a led, hooked up to the Pi’s GPIO pins (not sure how I’ll use it, though)
Remote access to the RPB
Most of my development is done at home, with the RPB in it’s fixed position at church. Therefor it’s important to have remote access.
The first step is to setup port forwarding on the router of the church network.
The second step is to setup dynamic dns, so I can access the RPB using a fixed domain name. I use dynu, because it’s free and requires no monthly reconfirmations. On the RPB I have ddclient running, configured in /etc/ddclient.conf.
protocol=dyndns2
use=web, web=checkip.dyndns.org/
server=api.dynu.com
login=************
password='************'
*****.ddnsfree.com
Running sudo ddclient -daemon=0 -debug -verbose -noquiet makes sure that ddclient is working OK.
Running sudo service ddclient start to launch the service.
Most of the time, I connect via mosh, providing ssh functionality and better coping with network hick-ups. If I need a GUI-tool, there’s realvnc.
Ssh and vnc are preconfigured on the pi and only need activation via sudo raspiconfig.
These are the ports that I forward to the RPB:

(the screenshot is old, I now use nginx i.o. lighttpd as web server, because it can handle rtmp video streaming)
Vnc can also be done through ssh tunneling, it’s probably safer, but also more cumbersome: after running ssh -L 1111:localhost:5901 pi@*****.ddnsfree.com, the RPB vnc server can be accessed via localhost:1111.
An alternative for access through port forwarding and dynamic dns, is using the wormhole concept, but I only found a commercial supplier Dataplicity, and even at the low price of $3 per month, I can spend that better.
On the local network, finding a headless Raspberry Pi has always challenged me, fiddling with fing on my mobile phone and commands like sudo nmap -sP 192.168.1.*, until I found out that it can run a bonjour service using the linux avahi service and make itself known for other devices using a hostname, defaulting to raspberrypi.local, which is of course configurable. Or you can find it by running avahi-browse --all.
Raspberry Pi UPS
If someone switches off the power (which happens more than often), a naked Raspberry Pi is getting a hard shutdown, causing potential (fatal) corruption on the SD-card.
There are different sorts of UPS modules available, with lithium batteries, with capacitors, with regular rechargeable batteries. The choices are plenty, but it was hard to find one that meets the Raspberry Pi 4 specs, with it’s 3A power supply, which I may need to feed the camera.
I finally settled for UPS PIco HV4.0B Stack, a modular system where you can choose several types of batteries and combine it with capacitors. I only need power to guarantee a proper shutdown on powercuts, but I want to be on the safe side.
Nginx web server with rtmp module
It took me a while to find out how powerful the nginx web server is, with it’s rtmp module. It can be used to consume or produce streams, relay them or convert them to hls for web viewing, to only name a few things.
I installed it from source, adding the rtmp module, using the instructions here. This means that all nginx files are in /usr/local/nginx. I had to create my own service file, under /etc/systemd/system/nginx.service:
[Unit]
Description=The nginx server
After=network-online.target remote-fs.target nss-lookup.target
[Service]
Type=forking
PIDFile=/usr/local/nginx/logs/nginx.pid
ExecStartPre=/bin/sleep 10
ExecStartPre=/usr/local/nginx/sbin/nginx -t -q -g 'daemon on; master_process on;'
ExecStart=/usr/local/nginx/sbin/nginx -g 'daemon on; master_process on;'
ExecReload=/usr/local/nginx/sbin/nginx -g 'daemon on; master_process on;' -s reload
ExecStop=-/sbin/start-stop-daemon --quiet --stop --retry QUIT/5 --pidfile /usr/local/nginx/logs/nginx.pid
TimeoutStopSec=5
KillMode=mixed
[Install]
WantedBy=multi-user.target
Because I had some problems with nginx trying to run before network was active, I changed the After= line and I added the line ExecStartPre=/bin/sleep 10
Another add-on is fcgiwrap, which I installed with apt. To make live easier, I want to run my cgi scripts as user pi, which is configured in /lib/systemd/system/fcgiwrap.service by adding under [Service]:
User=pi
Group=pi
To make sure these things are started automatically:
sudo systemctl enable nginx.service
sudo systemctl enable fcgiwrap
Nginx config file
My nginx.conf is in /usr/local/nginx/conf, because I compiled the program from source. It may be elsewhere if it’s installed from a package, but make sure you also have the rtmp module!
I’ll just run through the entries that I customized:
I want to run the server as user pi, that avoids lot’s of headaches when getting into cgi scripting. I know, it’s probably not secure, but you’ll see that I don’t really worry. I won’t do any ssl (https) stuff either.
user pi pi;
I think it’s convenient having all logging in /var/log/syslog. But even now, I still get parallell logging in /usr/local/nginx/logs/error.log.
error_log syslog:server=unix:/dev/log,tag=nginx,nohostname,severity=info;
In following section, the main architecture block is setup.
- The rtmp module is listening on port 1935 for rtmp input
- It launches the ffmpeg process that will be providing this input.
- It converts the input into hls video files
- It pushes (copies) the input to port 1936
Note how rtmp addresses are composed of a domain and a port and then an “application” name, followed by a “stream” name. The stream name is defined by the application that creates the stream, it is not part of the nginx configuration. In the topic on ffmpeg, I discuss the ffmpeg command that is run in the ffmpeg.sh script and you’ll see that the full rtmp address is “rtmp://localhost:1935/webcam/hhart”.
rtmp {
    server {
        listen 1935;
        chunk_size 4000;
        application webcam {
            live on;
            hls on;
            hls_path /tmp/webcam;
            deny play all;
            push rtmp://127.0.0.1:1936/webcam/;
            exec_static /usr/lib/cgi-bin/ffmpeg.sh;
            respawn on;
        }
    }
}
The following entries are all inside the http { … } block.
Also the access log goes into syslog:
access_log syslog:server=unix:/dev/log,tag=nginx,nohostname,severity=info combined;
The following entries are nested in a server { listen 80; …} block.
My user interface is a cgi webpage. It is in /usr/lib/cgi-bin. Cgi requires fcgiwrap to be installed and running! I had some trouble because the default nginx.conf referred to a fastcgi_params file that didn’t exist, but which I eventually found in /usr/local/nginx/conf.
location /cgi-bin/ {
        gzip off;
        root  /usr/lib;
        fastcgi_pass  unix:/var/run/fcgiwrap.socket;
        include /usr/local/nginx/conf/fastcgi_params;
        fastcgi_param SCRIPT_FILENAME  /usr/lib$fastcgi_script_name;
}
Because I have only one active webpage, I map it to the root address of the server.
rewrite ^/$ /cgi-bin/stream_auto.cgi;
In the rtmp section, hls files were produced, and here’s where they will be served to the outside world.
location /webcam {
    add_header 'Cache-Control' 'no-cache';
    add_header 'Access-Control-Allow-Origin' '*' always;
    add_header 'Access-Control-Expose-Headers' 'Content-Length';
    if ($request_method = 'OPTIONS') {
        add_header 'Access-Control-Allow-Origin' '*';
        add_header 'Access-Control-Max-Age' 2592000;
        add_header 'Content-Type' 'text/plain charset=UTF-8';
        add_header 'Content-Length' 0;
        return 204;
    }
    types {
        application/dash+xml mpd;
        application/vnd.apple.mpegurl m3u8;
        video/mp2t ts;
    }
    root /tmp/;
}
The user interface cgi script
The user interface for the RPB is a cgi script written in python. It’s very custom-made, so I’m going to extract some parts and explain.
The script is called stream_auto.cgi. It is in the /usr/lib/cgi-bin directory that is known in the nginx configuration and I also redirect the domain root address to this script.
The configuration of available streams is hard-coded. We typically broadcast to one youtube channel and two facebook pages simultaneously. I’ve hardcoded another set of outputs for testing, I switch between both by changing the code.
streams_real = [
        {
            'name': "Parochie Heilig Hart Antwerpen",
            'type': "youtube",
            'view': "https://www.youtube.com/channel/UCHEqX9lP-1Ro2zHy0kIdWwA/live"
        },
        {
            'name': "Federatie Warm-Noord",
            'type': "facebook",
            'view': "https://www.facebook.com/Federatie-Warm-Noord-106892174602365/live/"
        },
        {
            'name': "Parochie Heilig Hart Antwerpen",
            'type': "facebook",
            'view': "https://www.facebook.com/antonius.heilighart.antwerpen/live/"
        }
]
To preview the hls stream, I use video.js in my webpage. Here’s the html code from my jinja template. I recall that video.js is a pain in the *** to get styled. Even resizing it seems to be utterly impossible.
<style>
body {
   text-align: center;
}
div.video {
   padding: 12px;
}
.video-js {
   margin: auto;
}
</style>
<link href="//vjs.zencdn.net/7.8.2/video-js.min.css" rel="stylesheet">
<script src="//vjs.zencdn.net/7.8.2/video.min.js"></script>

<div class="video">
   <video id="my-video" class="video-js vjs-default-skin"
       autoplay controls preload="auto" vjs-big-play-centered
       data-setup='{}'>
       <source src="/webcam/hhart.m3u8" type="application/x-mpegURL"/>
   </video>
</div>
There’s a single cgi webpage, but the contents is conditionally rendered using a single jinja template with the necessary {% if …%} {% endif %} clauses. One thing the script will do, is to check if the output ffmpeg process is running. If it is running, the stop button is visible, if not, the start button.
Here’s my very basic bash script that checks of the output ffmpeg is running (knowing that it reads from port 1936 on the nginx server!)
#!/bin/bash
ps -ef | grep -E "ffmpeg.*:1936" | grep -v grep
And here’s how to run this in python:
ps = subprocess.getoutput('./pffmpeggrep.sh').split()
The pid is retrieved from ps[1], which I’ll need when processing the stop action, killing this process.
The webpage has two cgi forms. One for starting the streaming and one for stopping the streaming. The latter is simple: kill the output ffmpeg. Youtube and facebook will notice that the stream has stopped and stop the broadcasts. The former is more complex, involving initiation of the broadcasts via the youtube and facebook api’s.
This is the form for starting the streaming:
<form action="/cgi-bin/stream_auto.cgi" method="post">
        <input type="hidden" name="action" value="start">
        <p>Titel:<br/><input type="text" name="title" value="{{ liturgical_day|e }}" size=40></p>
        <p>Beschrijving:<br/><textarea name="description" rows=4 cols=40>Live H. Mis vanuit de Heilig-Hartkerk</textarea></p>
        <p>Wachtwoord:<br/><input type="password" name="password"></p>
        <p><input type="submit" value="Start streaming"></p>
</form>
When the page is loaded after clicking this button, this is how the input parameters are retrieved in python:
# get POST parameters
form = cgi.FieldStorage()
action = form.getvalue('action')
Starting the streaming involves these steps:
- running create_broadcast.py to get the youtube rtmp address (see the topic about the youtube livestream api for more details)
- running facebook-live-video.py to get the facebook rtmp address (see the topic about the facebook livestream api for more details)
- launching an ffmpeg process that reads from the rtmp stream that nginx pushes to port 1936 and copies it to all of the youtube and facebook rtmp addresses.
This is how the ffmpeg command is composed and how it is launched as a daemon process:
command = "/usr/lib/cgi-bin/ffmpeg -f flv -listen 1 -i rtmp://127.0.0.1:1936/webcam/"
for stream in streams:
    command += " -c copy -f flv '" + stream['rtmp'] + "'"
os.system("daemon --stdout=daemon.info --stderr=daemon.err -- %s" % command)
One advantage of building your own streaming platform is that you can enrich it with custom features. Here I fetch from some 3rd party website the name of today’s liturgical day, to put it in the title field as default entry:
# get liturgical day
date = datetime.datetime.today().strftime('%Y-%m-%d')
url = "https://publication.evangelizo.ws/NL/days/" + date
resp = requests.get(url).text
data = json.loads(resp)
liturgical_day = data['data']['liturgic_title']
Another feature on the website is a button to reboot the pi, in case something’s wrong with the preview.
This bash script is launched by the cgi script and will schedule a reboot within 5 seconds. All the weird redirectioning is required so the cgi script won’t be waiting for the reboot to happen.
#!/bin/bash
( sleep 5 ; sudo reboot ) &>/dev/null & disown
Five seconds is enough for the cgi script to return a webpage confirming that the reboot is ongoing and including a tiny bit of javascript that will automatically return the user to the main webpage after 2 minutes. I’ll just print the whole reboot cgi script here, because it’s compact and still gives a good idea of how all the html/cgi/python is hanging together:
#!/usr/bin/python3
from jinja2 import Template
import subprocess, shlex
import os
import cgi, cgitb
import logging
cgitb.enable() # this will display trace information in the browser
tm = Template('''Content-type: text/html
<!DOCTYPE html>
<html>
        <head>
                <title>Heilig Hart Livestream</title>
                <meta http-equiv="Content-Type" content="text/html; charset=utf-8"/>
                <style>
                body {
                    text-align: center;
                }
                </style>
                <meta name="viewport" content="width=device-width, initial-scale=1">
        </head>
        <body>
                <h1>Heilig Hart Livestream</h1>
                <p><a href="/">Ga terug naar het hoofdscherm</a></p>
                {% if reboot %}
                <script>
                   setTimeout(function(){
                      window.location.href = '/';
                   }, 120000);
                </script>
                <p>Deze pagina schakelt over 2 minuten terug naar het hoofdscherm.</p>
                <p>(na een reboot kan het nog even duren voor je weer beeld krijgt!)</p>
                {% endif %}
                {% if report %}
                <h2>Rapport</h2>
                <pre>{{ report|e }}</pre>
                {% endif %}
                {% if not reboot %}
                <form action="/cgi-bin/shutdown.cgi" method="post">
                        <input type="hidden" name="action" value="reboot">
                        <p>Wachtwoord:<br/><input type="password" name="password"></p>
                        <p><input type="submit" value="Reboot"></p>
                </form>
                {% endif %}
        </body>
</html>
''')
report = ''
reboot = False
def main():
    global report
    global reboot
    # get POST parameters
    form = cgi.FieldStorage()
    action = form.getvalue('action')
    # handle actions
    if action == 'reboot':
        if not form.getvalue('password') == "*****":
            report += "Wrong password"
        else:
            subprocess.getoutput('./shutdown.sh')
            report += "Rebooting... "
            reboot = True
    output = tm.render(
            report=report,
            reboot=reboot
    )
    print(output)
main()
Youtube livestream api
Probably the most important feature of the RPM is the automated streaming. No need to go to studio.youtube.com in a browser (on pc, not supported on mobile!), set up the stream and then launch the rtmp stream on some other application or device. It’s all done automatically through the api.
I script my automation in python, so I had to install the client library first: python3 -m pip install google-api-python-client. Some extra packages were needed, but the error messages while running my script were clear enough.
As a starting point, I took the sample script create_broadcast.py. I ported it to python 3 (mainly print statements). It needed an update in the insert_stream() function, because it was missing some required parameters: framerate="variable", ingestionType="rtmp", resolution="variable". I set enableAutoStart and enableAutoStop in the insert_broadcast() function. I added some code to fetch the rtmp address from this response: insert_stream_response["cdn"]["ingestionInfo"]. Finally, I replaced print() by logging.info() and I reserve the stdout for a json string containing the information that I really need: the video id and the rtmp address.
The most important prerequisite to get the script running, is authentication. It’s a two-stepped approach: you have to authenticate once to your google account, some credentials are stored in a file, which is then used for authorizing subsequent runs of the script. This is how it’s done:
- go to google cloud console and create (or open) a project and activate the Youtube Data API v3
- still in the google cloud console, create an oauth 2.0 client ID for a desktop app, covering scope
https://www.googleapis.com/auth/youtube - download its client_secrets.json, this file has to be kept with the script (the script contains a path where it will look for it), mind: this isn’t the credentials file for accessing the api, that comes later!
- now run
create_broadcast.py --noauth_local_webserver, open the displayed url in a browser, select the user account and the youtube channel you want to authenticate with and return the code to the script. - if all goes fine, the script will now create a new stream on your youtube channel (you can see it on studio.youtube.com as a scheduled live video), but it will also produce a file create_broadcast.py-oauth2.json containing credentials that will be used to authenticate the next time the script is run. To be able to use different accounts/channels (e.g. for testing), I changed the script so I can have a set of these files, one for each account/channel, which I can select using an extra command line parameter.
Facebook livestream api
For facebook, there is no python client library, and no sample code. And documentation that only becomes clear after you understand its content (you know, it’s meant to be the other way around). At some point I thought that I had to go through app review and create a business account to get the api working, but that proved wrong. That’s only needed if you want to have an app that allows external users to send data through the api to your pages. Because I have a role on the pages where I want to publish live video, and no other user accounts are involved, it works without app review.
As for the missing client library, no big deal either, because the graph api is a very clean rest api. I had more trouble with finding out how urllib works on python3 than with finding out which requests to make (hey, requests seems the better alternative for urrlib).
Authentication is two-stepped: in the first step you create long-lived access tokens for each page you want to publish on. In the second step, these tokens authorize the use of the api, without the need for a personal login.
Very first step is creating an app: https://developers.facebook.com. Note down your app id and app secret.
For authentication step 1, I have a script facebook-token.py:
input: a short-lived user access token, which you can obtain by visiting the graph explorer and making sure these permissions are selected: publish_video, pages_show_list, pages_read_engagements, pages_manage_posts. Just copy the token on the right, you don’t have to do anything in the big fields.
input (I have it hardcoded in the script): the app id and the app secret.
step 1: turn the short-lived user access token into a long-lived user access token:
# build the URL for the API endpoint
host = "https://graph.facebook.com"
version = "/v9.0"
path = "/oauth/access_token"
params = urllib.parse.urlencode({
    "grant_type": "fb_exchange_token",
    "client_id": app_id,
    "client_secret": app_secret,
    "fb_exchange_token": short_lived_user_access_token})
url = "{host}{version}{path}?{params}".format(host=host, version=version, path=path, params=
params)
# open the URL and read the response
resp = urllib.request.urlopen(url).read()
# convert the returned JSON string to a Python datatype
me = json.loads(resp)
long_lived_user_access_token = me['access_token']
step 2: obtain long-lived user access tokens for all the pages that you manage:
# build the URL for requesting the long-lived page access token
path = "/me/accounts"
params = urllib.parse.urlencode({
    "access_token": long_lived_user_access_token})
url = "{host}{version}{path}?{params}".format(host=host, version=version, path=path, params=params)
# open the URL and read the response
resp = urllib.request.urlopen(url).read()
# write the output to a json file
with open('facebook.json', 'w') as outfile:
    json.dump(json.loads(resp), outfile, indent=4)
output: as you can see, is a json file in which you’ll easily find the required access tokens.
The above steps should be done only once.
For the live streaming itself, I have another script, facebook-live-video.py:
input: the name of the page
step 1: the script uses the page name to look up the long-lived page access token in the json file
# get long-lived Facebook page access token
with open('facebook.json') as json_file:
        data = json.load(json_file)
long_lived_page_access_token = ""
for page in data["data"]:
    if page["name"] == page_name:
        long_lived_page_access_token = page["access_token"]
        break
step 2: call the api to obtain the stream info, including the rtmp address:
# build the URL for the API endpoint
host = "https://graph.facebook.com"
version = "/v9.0"
path = "/me/live_videos"
params = {
    "status": "LIVE_NOW",
    "title": broadcast_title,
    "description": broadcast_description,
    "access_token": long_lived_page_access_token}
url = "{host}{version}{path}".format(host=host, version=version, path=path)
# open the URL and read the response
resp = requests.post(url, params=params).text
# print the returned JSON string
print(json.dumps(json.loads(resp), indent=4))
If you’re working with access tokens, find out what each token contains using the access token debugger: https://developers.facebook.com/tools/debug/accesstoken
V4l2 and ffmpeg
Typical ffmpeg commands take a long chain of command line parameters. It’s only after a while of experimenting, that I found out that there’s actually some structure in these parameters. Take e.g. this command, which I use to read the video stream from the camera and output it as an rtmp stream into nginx:
/usr/lib/cgi-bin/ffmpeg -f v4l2 -framerate 30 -video_size 1280x720 -input_format h264 -i /dev/video0 -f alsa -ac 2 -i hw:2 -codec:v copy -codec:a aac -b:a 128k -ar 44100 -strict experimental -f flv "rtmp://localhost:1935/webcam/hhart"
There are actually three blocks:
- the video input:
-f v4l2 -framerate 30 -video_size 1280x720 -input_format h264 -i /dev/video0 - the audio input:
-f alsa -ac 2 -i hw:2 - the output:
-codec:v copy -codec:a aac -b:a 128k -ar 44100 -strict experimental -f flv "rtmp://localhost:1935/webcam/hhart"
Each input block ends with an -i argument, identifying the source device. For me, /dev/video0 is my HQ camera module, controlled by the v4l2 video driver, and hw:2 is an USB audio input, controlled by the alsa audio driver. You may have different devides if you have different devices or drivers installed. Run arecord -l to see your audio input devices. If the USB adapter is card 2, you have to specify "-f alsa -i hw:2".
The output format ‘flv’ stands for flash video, a container that supports h.264 video and aac audio and that can be transferred over the rtmp protocol. You can add additional output blocks, which I’ll address elsewhere.
It is interesting to notice that I don’t convert the video in the output: my video codec is ‘copy’. The camera delivers the video in h.264 format, which ffmpeg forwards unaltered to the output, only adding the audio signal. This is of course very beneficial for the cpu load!
The data that comes out of /dev/video0 is produced by the v4l2 linux video driver. It has quite some settings to tweak, but so far I only changed the bitrate, setting it like this: v4l2-ctl --set-ctrl video_bitrate=2500000 which is 2500 kbps, suitable for youtube and facebook streaming. A more user friendly way to control the camera settings is to install python3 -m pip install git+https://github.com/antmicro/pyvidctrl, an ncurses graphical interface.
I’m not too familiar with how the audio is processed, but there is the alsamixer application to adjust volume.
An alternative for using the v4l2 drivers, is the uv4l application, which is run from the command line as a normal user, contains its own drivers for the camera and also produces a /dev/video* device. uv4l comes with its own html-server-based toolset, which I had a look at, but it didn’t suit my purposes.
On the raspberry pi os you also get the raspivid application. It can be maily useful to get an instant camera reading using the command raspivid -t 0, for when you’re e.g. finetuing the v4l2 settings, or manually focusing the lens.
The ffmpeg build that is packaged with the raspberry pi os didn’t work for me, so I had to recompile it. To see how an ffmpeg binary was built, just run it. Mine says:
  built with gcc 8 (Raspbian 8.3.0-6+rpi1)
  configuration: --enable-indev=alsa --enable-nonfree --enable-version3 --enable-static --disable-debug --disable-ffplay --disable-indev=sndio --disable-outdev=sndio --cc=gcc --enable-fontconfig --enable-openssl --enable-gmp --enable-gray --enable-libfribidi --enable-libass --enable-libfreetype --enable-libmp3lame --enable-libopencore-amrnb --enable-libopencore-amrwb --enable-libsoxr --enable-libvorbis --enable-libopus --enable-libvo-amrwbenc --enable-libvpx --enable-libwebp --enable-libxml2 --enable-libzimg
Especially the options nonfree and openssl are important to get into facebook, which requires rtmps i.o. rtmp.
Verwante onderwerpen...
-
Kladschilders
 WherePeterIs is een blog waar volgens de beste apologetische methodes het kerkbeeld en -beleid van paus Franciscus van …
-
Het digitaal missaal
 Het is eindelijk zo ver: katholieken in Nederland en Vlaanderen krijgen een digitaal missaal!
www.tiltenberg.org/missaal …
Het is eindelijk zo ver: katholieken in Nederland en Vlaanderen krijgen een digitaal missaal!
www.tiltenberg.org/missaal …
-
De Paus liegt niet!
 Er is weer verse olie op het vuur gegoten dat woedt na het motu proprio Traditionis Custodes dat paus Franciscus …
-
Over de ritus van dit Sacrament (uit de Summa)
 Hoewel de nasmaak wrang blijft, wordt het tijd de bladzijde met het vermaledijde motu proprio Traditionis Custodes om te …
-
Het doemscenario van paus Franciscus, concilii custos
 Groot als mijn ontsteltenis was bij het vernemen van het motu proprio Traditionis Custodes, heb ik heel wat rondgelezen. …